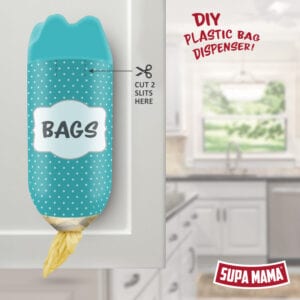
Are you tired of having your plastic shopping bags in a mess? Or are you fed up with folding them into lots of tiny triangles? This DIY plastic bag dispenser will save a 2l soda bottle from the recycling bin and make storing and dispensing your bags SUPA simple!
What you will need:
- Clean 2l soda bottle – label and sticky residue removed
- Whiteboard marker
- Craft knife and a pair of sharp scissors
- Masking tape
- Spray paint in colours of your choice
- Strong double-sided tape for hanging
To Make
- Using a whiteboard marker, draw a line right around the bottle neck (about 2.5cm below the start of the neck).
- Cut the top off using a craft knife slowly (you should now have a 7.5cm opening) and clean away the whiteboard markings.
- Using masking tape, tape off the bottom of the soda bottle – about 7.5cm from the base.
- Cut along the line of the masking tape, removing the bottom of the bottle and set aside (this is now the lid of your dispenser). Neaten all cut edges with scissors neatly.
- Cut two slits as indicated to allow the lid to fit over your new dispenser carefully.
- Decorate both parts with spray paint as desired. You can even make and add your own label!
- Hang using double-sided tape!
To fill, simply bunch up your plastic bags into balls (as simple as that), add in and close with the lid. Retrieve your bags from the bottom opening and you are ready to go shopping with the DIY plastic bag dispenser!
SUPA TIP:
Once your plastic bags are worse for wear, be sure to recycle them to avoid them going to the landfill.